零、前端工程化
前端工程化主要解决的问题:
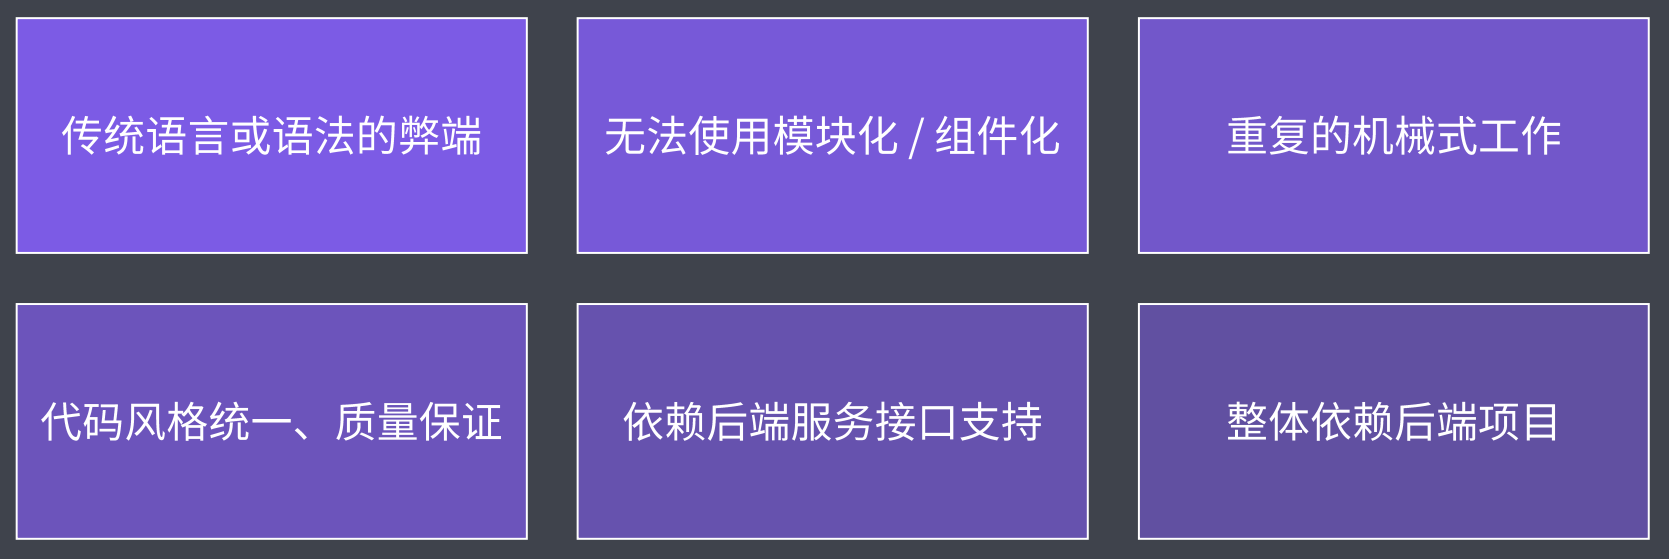
工程化的表现:
- 创建项目
- 创建项目结构
- 创建特定类型文件
- 编码
- 格式化代码
- 校验代码风格
- 编译/构建/打包
- 预览/测试
- Web Server/Mock
- Live Reloading/HMR(热更新)
- Source Map
- 提交
- Git Hooks
- Lint-staged
- 持续集成
- 部署
- CI/CD
- 自动发布
成熟的流程:

一、脚手架工具
脚手架的本质作用:创建项目基础结构、提供项目规范和约定
- 相同的组织架构
- 相同的开发范式
- 相同的模块依赖
- 相同的工具配置
- 相同的基础代码
二、前端脚手架
1.内容概要
- 脚手架的作用
- 常用的脚手架工具
- 通用脚手架工具剖析
- 开发一款脚手架
脚手架的本质作用:创建项目基础结构、提供项目规范和约定。
2.常用的脚手架
- React.js项目–>create-react-app
- Vue.js项目–>vue-cli
- Angular项目–>angular-cli
- Yeoman
- Plop:创建特定类型的文件
3.Yeoman基本使用
在全局范围安装yo
npm install yo --global # or yarn global add yo安装对应的generator
npm install generator-node --global # or yarn global add generator-node通过yo运行generator
cd project-dir
mkdir my-module
yo node
4.Yeoman Sub Generator
常规使用步骤:
- 明确需求
- 找到合适的Generator
- 全局范围安装找到Generator
- 通过yo运行对应的Generator
- 通过命令行交互填写选项
- 生成你所需要的项目结构
Sub Generator使用示例:yo node:cli
- 使用yo node:cli命令安装
- yarn link引导全局
- 使用my-module –help查看
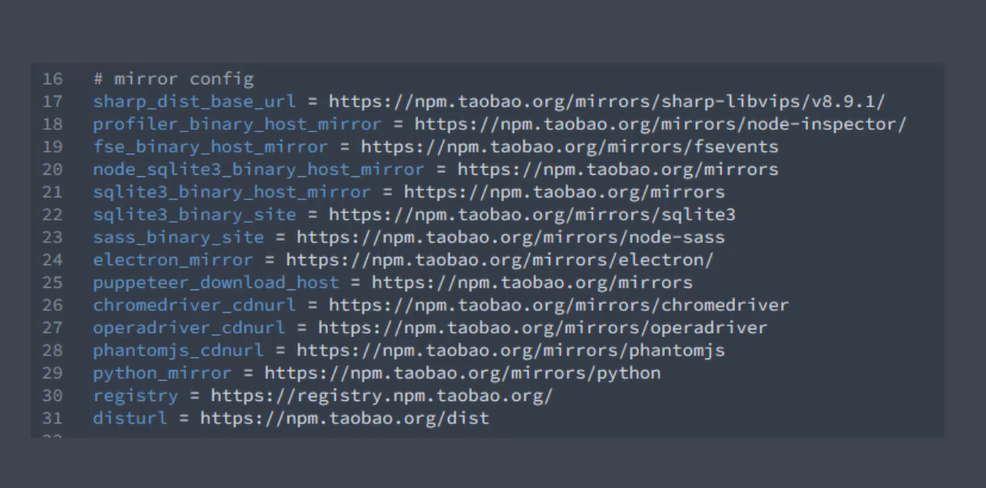
淘宝镜像源加速配置:
5.创建Generator模块
Generator本质上就是一个NPM模块
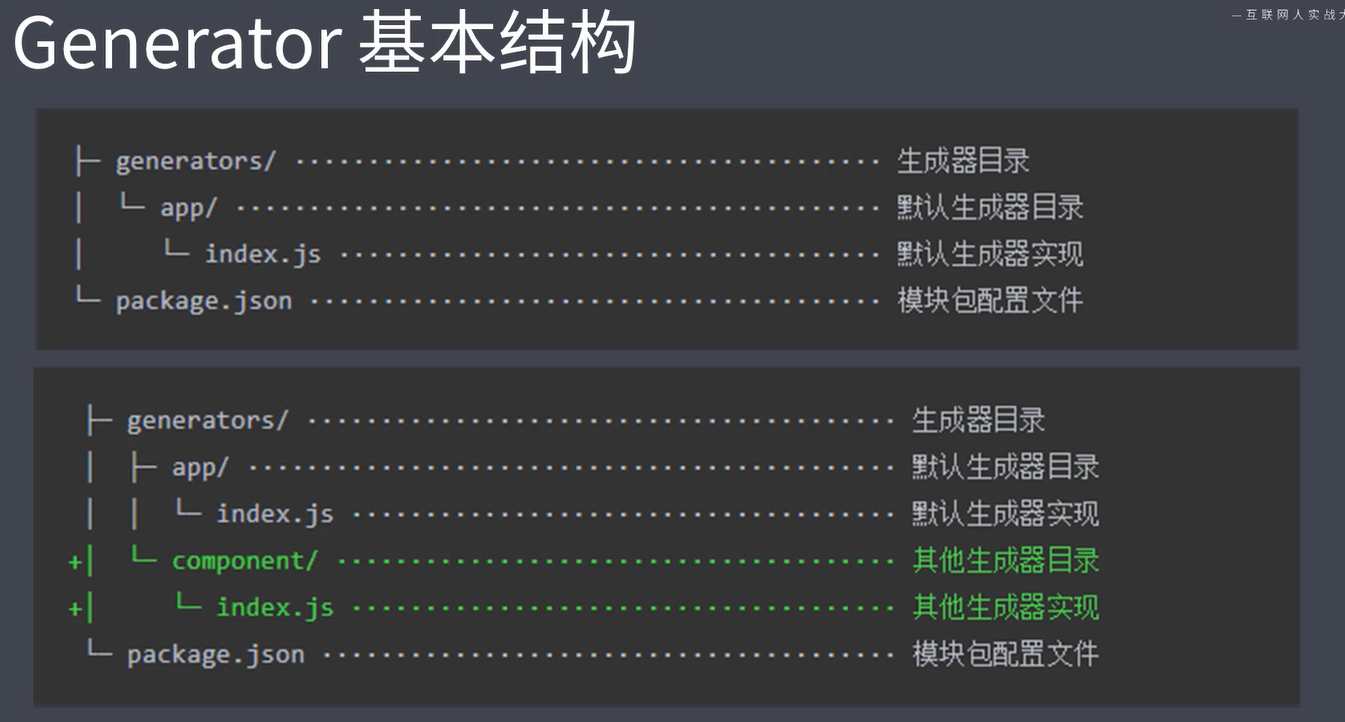
Generator模块需求:名称必须为generator-
- 基本使用步骤
命令行内容
mkdir generator-sample  # 创建项目目录
cd generator-sample
yarn init  #初始化项目
yarn add yeoman-generator  # 安装依赖
根据模板创建文件
- 进入generator-sample,创建目录generators
- 进入generators创建index.js
编写index.js
// 此文件作为 Generator 的核心入口
// 需要导出一个继承自 Yeoman Generator 的类型
// Yeoman Generator 在工作时会自动调用我们在此类型中定义的一些生命周期方法
// 我们在这些方法中可以通过调用父类提供的一些工具方法实现一些功能,例如文件写入

const Generator = require('yeoman-generator')

module.exports = class extends Generator {
    // Yeoman 自动在生成文件阶段调用此方法

    // 我们这里尝试往项目目录中写入文件
    writing () {
        this.fs.write(
            this.destinationPath('temp.text'),
            Math.random().toString()
        )
    }
}
命令行运行
yarn link  # 将模块包引至全局
cd ..  # 切回上级目录
mkdir my-project
cd my-project
yo sample  # 运行yo sample命令,查看生成的文件temp.txt
- 进阶使用步骤
上述过程中除index.js文件内容不同,其余都相同
// 此文件作为 Generator 的核心入口
// 需要导出一个继承自 Yeoman Generator 的类型
// Yeoman Generator 在工作时会自动调用我们在此类型中定义的一些生命周期方法
// 我们在这些方法中可以通过调用父类提供的一些工具方法实现一些功能,例如文件写入

const Generator = require('yeoman-generator')

module.exports = class extends Generator {
  prompting () {
    // Yeoman 在询问用户环节会自动调用此方法
    // 在此方法中可以调用父类的 prompt() 方法发出对用户的命令行询问
    return this.prompt([
      {
        type: 'input',
        name: 'name',
        message: 'Your project name',
        default: this.appname // appname 为项目生成目录名称
      }
    ])
    .then(answers => {
      // answers => { name: 'user input value' }
      this.answers = answers
    })
  }
  writing () {
    // Yeoman 自动在生成文件阶段调用此方法

    // // 我们这里尝试往项目目录中写入文件
    // this.fs.write(
    //   this.destinationPath('temp.txt'),  // 文件绝对路径
    //   Math.random().toString()
    // )

    // -------------------------------------------------------

    // // 通过模板方式写入文件到目标目录

    // // 模板文件路径
    // const tmpl = this.templatePath('foo.txt')
    // // 输出目标路径
    // const output = this.destinationPath('foo.txt')
    // // 模板数据上下文
    // const context = { title: 'Hello zce~', success: false }

    // this.fs.copyTpl(tmpl, output, context)

    // -------------------------------------------------------

    // 模板文件路径
    const tmpl = this.templatePath('bar.html')
    // 输出目标路径
    const output = this.destinationPath('bar.html')
    // 模板数据上下文
    const context = this.answers

    this.fs.copyTpl(tmpl, output, context)
  }
}
6.Plop使用
官方简介:
我喜欢把Plop称为“微型发电机框架”。现在,我称其为“小工具”,因为它为您提供了一种以一致的方式生成代码或任何其他类型的纯文本文件的简单方法。您会看到,我们都在代码中创建了结构和模式(路由,控制器,组件,帮助程序等)。这些模式会随着时间的推移而变化和改进,因此当您需要在此处创建新的模式插入名称时,在代码库中查找代表当前“最佳实践”的文件并不总是那么容易。那就是挽救您的地方。使用plop,您将拥有在code中创建任何给定模式的“最佳实践”方法。可以通过输入plop轻松地从终端运行代码。这不仅使您免于在代码库中四处寻找要复制的正确文件,而且还使“正确的方式”变成了“创建新文件的最简单的方式”。
React项目中使用plop步骤
项目初始结构
[外链图片转存失败,源站可能有防盗链机制,建议将图片保存下来直接上传(img-dhLtMGaC-1606035018990)(%E6%93%B7%E5%8F%96-1605681121108.JPG)]
安装plop至开发环境中
yarn add plop --dev在项目根目录中创建plopfile.js文件,并编写以下代码
// Plop入口文件,需要导出一个函数
// 此函数接受一个plop对象,用于创建生成器任务
module.exports = plop => {
    plop.setGenerator('component', {
        description: 'Create a component',
        prompts: [
            {
                type: 'input',  // 问题的输入方式
                name:'name',  // 问题返回值的键
                message: 'Component name:',  // 屏幕上给出的提示
                default: 'MyComponent',  // 问题的默认答案
            }
        ],
        actions: [
            {
                type: 'add',  // 添加一个全新的文件
                path: 'src/components/{{name}}/{{name}}.js',  // 添加文件的存放位置
                templateFile: 'plop-templates/component.hbs',  // 模板文件的位置
            }
        ]
    })
}
创建plop-templates目录,在其中添加模板文件component.hbs,内容如下:
import React from 'react'

export default () => {
    <div className="{{name}}">
        <h1>{{name}}</h1>
    </div>
}
命令行运行
yarn plop component  # component是我们在plop中plop.setGenerator中的第一个参数
yarn run v1.22.10
$ F:\2020\Others\important\lagou\02-01-study-materials\code\02-01-02-05-react-app\node_modules\.bin\plop component
? Component name: Footer
√  ++ \src\components\Footer\Footer.js
Done in 3.79s.
至此我们就可以在src/components中看到我们生成的Footer目录,其中文件为Footer.js